Integrations
Integrations
Microsoft Azure Single Sign-On (OAUTH2)
You may want to integrate with Microsoft Azure Active Directory (AD) if:
- you want to let users (such as employees in your company) into your application from an Azure AD controlled by you or your organization.
- you want to let users coming from other companies' Azure ADs into your application. (You may want to set up those external directories as different connections.)
Steps
To connect OBS ERP to Microsoft Azure AD, you must:
- Set up OBS EPR in the Microsoft Azure portal.
- Create an enterprise connection in OBS ERP.
- Test the connection.
Microsoft Azure Account
Before proceeding, you will need a valid Microsoft Azure account and must have your own Microsoft Azure AD directory for which you are a Global administrator.
If you don't have a Microsoft Azure account, you can sign up for free; then, if necessary, set up an Azure AD directory by following Microsoft's Quickstart: Create a new tenant in Azure Active Directory - Create a new tenant for your organization.
Alternatively, if you have an Office 365 account, you can use the account's Azure AD instance instead of creating a new one. To access your Office 365 account's Azure AD instance:
- Sign in to Office 365, and navigate to the Office 365 Admin Center.
- Open the Admin centers menu drawer located in the left menu, and click on Azure AD.
Set up your app in the Microsoft Azure portal
To allow users to log in using a Microsoft Azure Active Directory account, you must register your application in the Microsoft Azure portal.
Note: Before proceeding, you must have already set up your own Microsoft Azure AD directory for which you are a Global administrator. To learn how, follow Microsoft's Quickstart: Create a new tenant in Azure Active Directory - Create a new tenant for your organization.
Register a new application
To learn how to register your application with Azure AD, follow Microsoft's Quickstart: Register an application with the Microsoft identity platform doc.
Note: If you have more than one Azure AD directory, make sure you are in the correct directory when you register your app.
While setting up your app, make sure you use the following settings:
- If you want to allow users from external organizations (like other Azure AD directories), then when asked to choose Supported account types, choose the appropriate multitenant option. Multitenant options include the following: Accounts in any organizational directory (Any Azure AD directory - Multitenant).
- When asked to set a Redirect URI, enter your callback URL:
https://{instance}.obs2go.com/oauth/oauth.
Create a client secret
To learn how to create a client secret, follow Microsoft's Quickstart: Configure a client application to access web APIs - Add Credentials to your web application. You want to generate a Client secret. Once generated, make note of this value.
Note: If you configure an expiring secret, make sure to record the expiration date; you will need to renew the key before that day to avoid a service interruption.
Add permissions
To learn how to add permissions, follow Microsoft's Quickstart: Configure a client application to access web APIs - Add permissions to access web APIs. You want to configure permissions for the Microsoft Graph API.
While setting up your permissions, make sure you use the following settings:
- When asked for a permission type, choose Delegated permissions. Under User, select User.Read so your app can sign in users and read the signed-in user's profile. Under Directory, select Directory.Read.All so your app can read directory data on the signed-in user's behalf.
Note: If you want to enable extended attributes (like Extended Profile or Security Groups), then you also must enable the following:
- Delegated permissions: Under Directory, select Directory.AccessAsUser.All so your app can access the directory as the signed-in user.
- Application Permissions: Under Directory, select Directory.Read.All so your app can read directory data.
Create an enterprise connection in OBS ERP
Open "Administration -> Settings -> Preferences" and add the following variables:
| Description | Key | Value |
|---|---|---|
| MS Azure Resource | AzureResource | {resource} e.g. for v1: api://2d4170c2-09ef-4532-9266-4ea9ec46c9bf ----- for v2.0: https://graph.microsoft.com/User.Read https://graph.microsoft.com/Mail.Send https://graph.microsoft.com/Mail.Read Space delimited URLs |
| MS Azure Directory Tenant ID | AzureTenantID | {tenant} e.g. ab00192f-94a1-4f17-bc3a-062b03ae3c43 |
| Token URL in MS Azure | AzureTokenURL | https://login.microsoftonline.com/{tenant}/oauth2/v2.0/token |
| Authorization URL in MS Azure | AzureAuthURL | https://login.microsoftonline.com/{tenant}/oauth2/v2.0/authorize |
| Application ID in MS Azure | AzureClientID | {application_id} e.g. 2d4170c2-09ef-4532-9266-4ea9ec46c9bf |
| MS Azure Client Secret | AzureClientSecret | {secret} e.g. QlpXFFeqy5x-l5z1uNgbZInSEfn_oBf= |
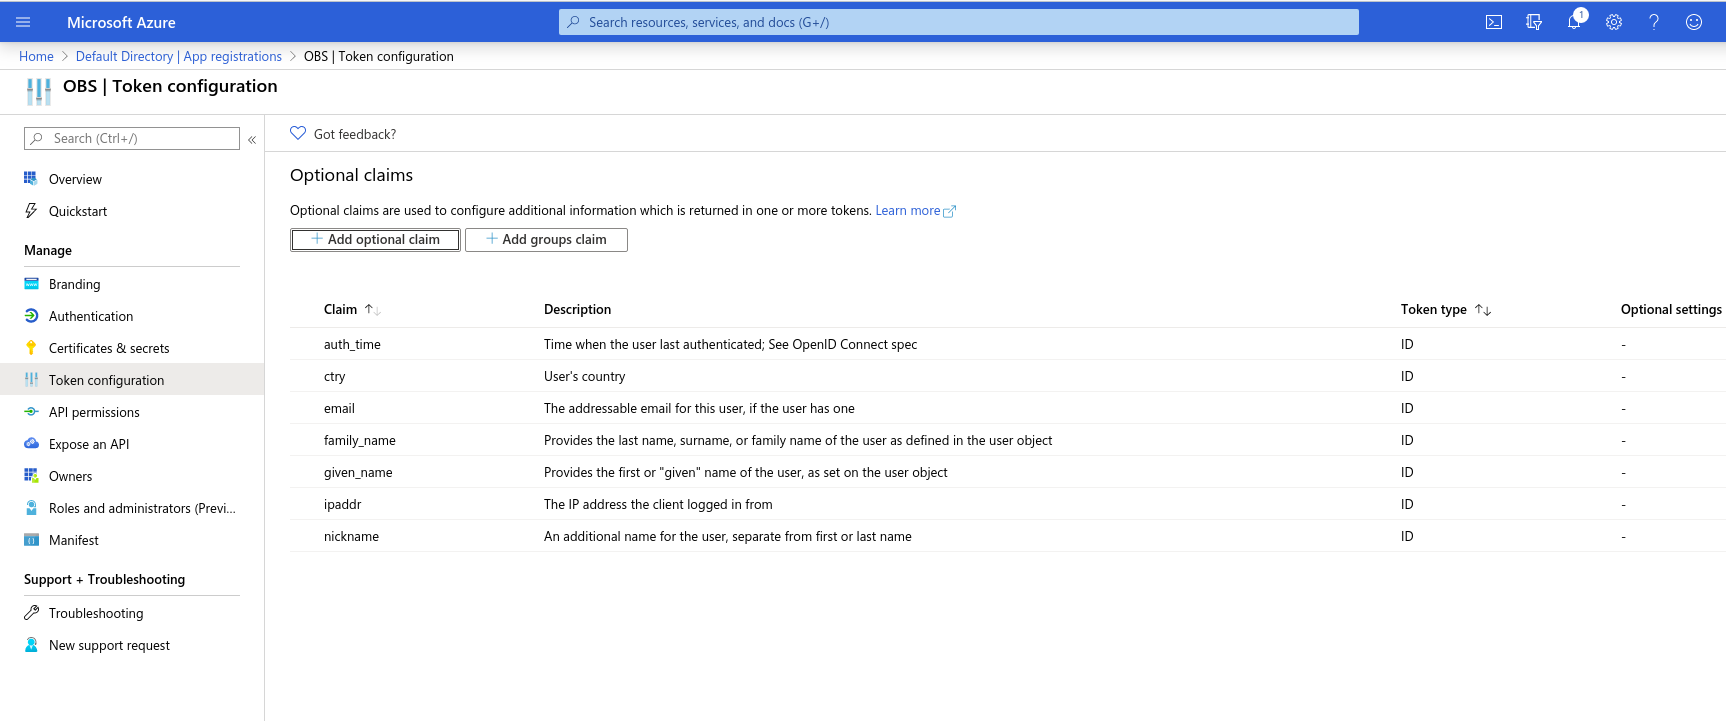
Token configuration
Make sure the following claims are on the list:
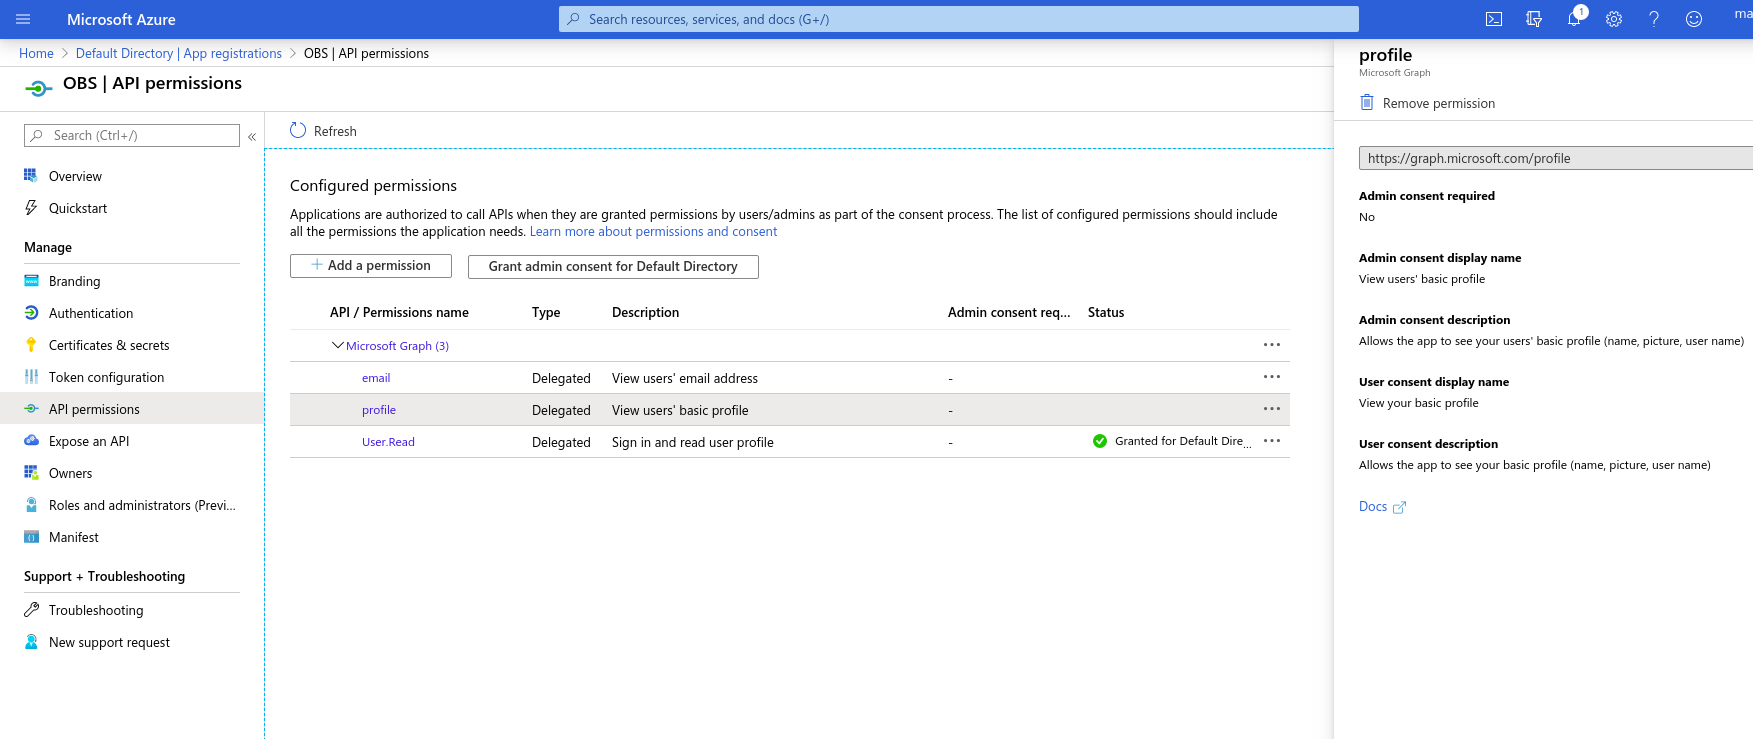
API Permissions:
The following permissions shall be on the list:
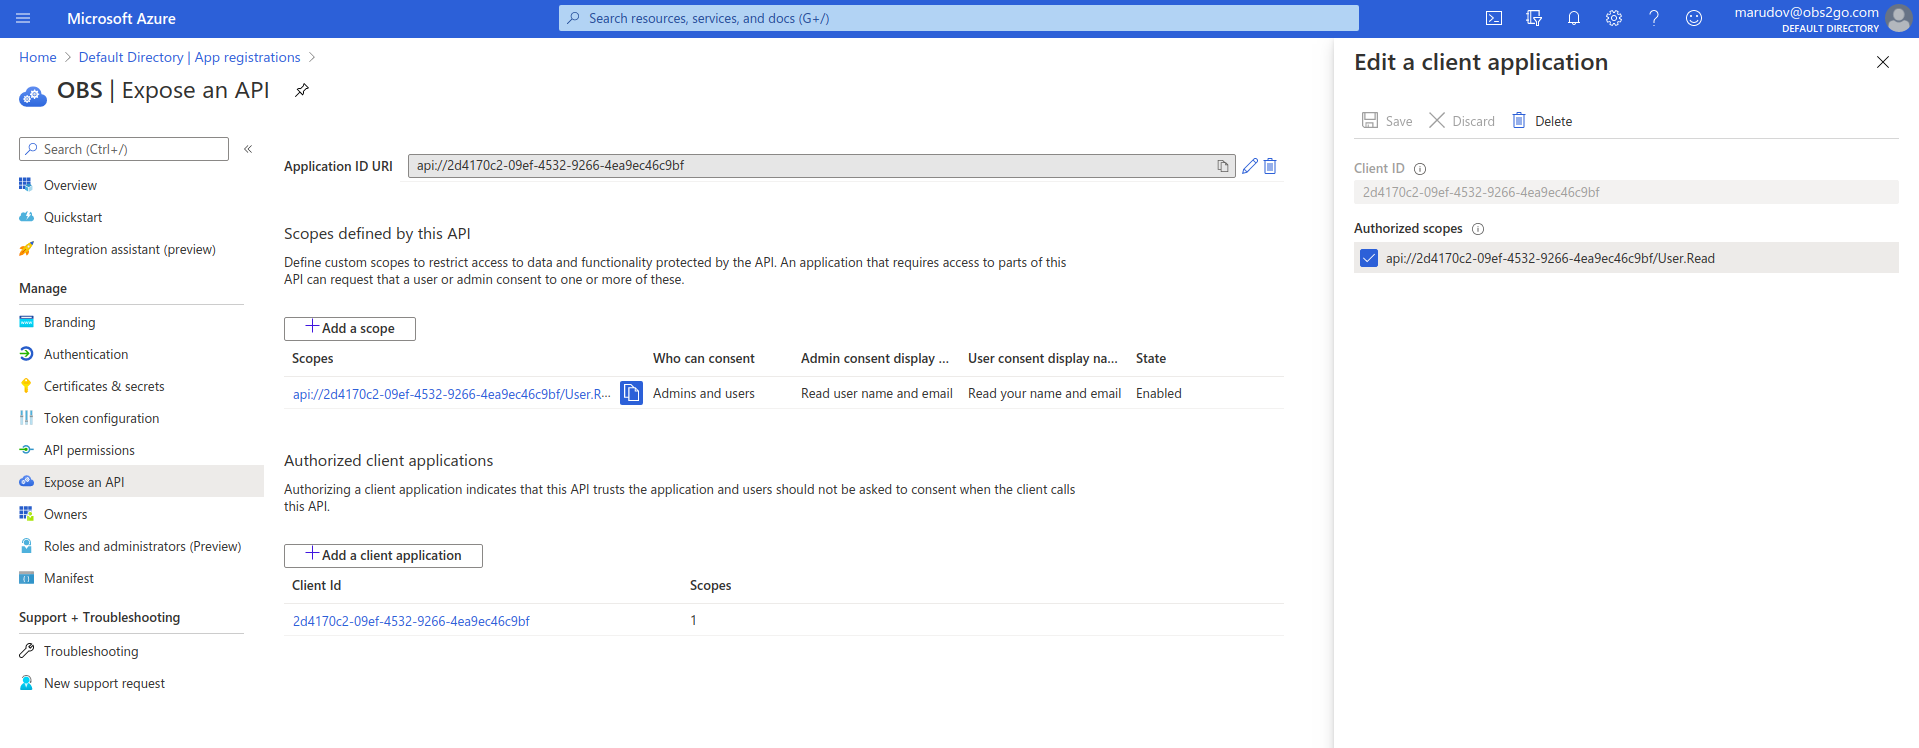
Expose API:
Make sure you have similar configuration:
Authorized client applications:
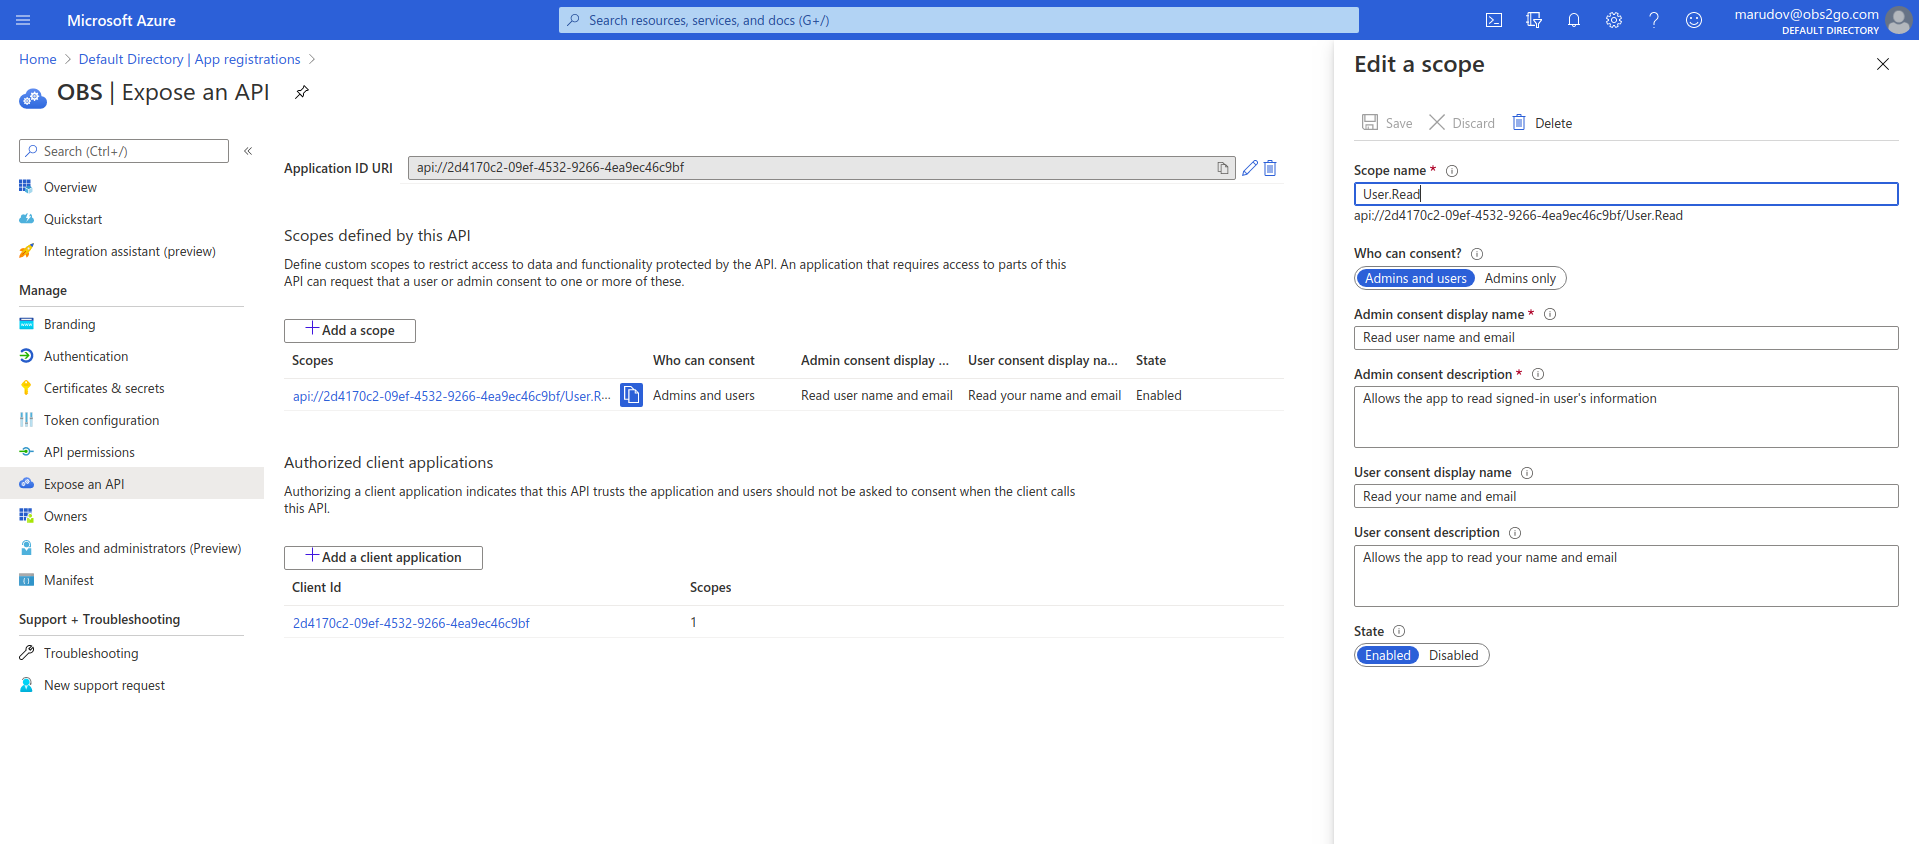
Scope:
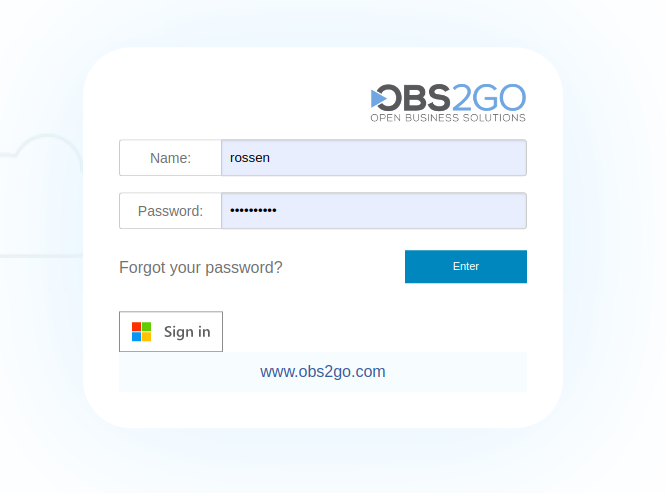
As a result the login page of your OBS ERP instance will include the Microsoft Sign-in button
SMS
OBS ERP is integrated with the SMS provider Twilio. You would need an account @ Twilio in order to send SMS messages through OBS ERP.
After obtaining a Twilio account, you need to set up some values in the "Settings" module (Administration -> Settings -> Preferences)
| Description | Key | Value |
|---|---|---|
| Twilio phone number | twilio_phone | +19712594902 |
| Twilio API User | twilio_user | AC30b75a8111fa8fd09c1b |
| Twilio SMS Provider API URL | twilio_api_url | https://api.twilio.com/2010-04-01/Accounts/__sid__/Messages.json |
| Twilio SMS Provider Authentication token | twilio_auth_token | 0e80edc2b2003179fc46 |
Then you can use the SMS provider to notify customers for overdue payments or other custom notifications.
GitLab
You may want to integrate with GitLab if you use it for project management. OBS can syncronize the following information on a regular basis:
- Projects
- Issues
- Time Tracking
Requirements:
- OBS ERP Settings
| Description | Key | Value |
|---|---|---|
| GitLAB Repository | gitlab_repo | https://gitlab.yourdomain.com |
| GitLAB User | gitlab_user | [email protected] |
| GitLAB password | gitlab_pass | 0e80edc2b2003179fc46 |
- The email addresses of the users in GitLab are used as unique identifiers and they must be configured.
Data synchronization on a regular basis
- You may setup a regular task in the main scheduler of OBS ERP, e.g. run every day function "IssuePostRequest" with parameter:
https://yourinstance.obs2go.com/gitlab/import_projects_tasks_and_time_tracking|{"username":"john", "pwd":"yourpassword"}
This job will update the existing or insert new projects, tasks and tracked time.
Revolut
The following operations can be performed in OBS ERP:
- Import transactions history
- Import account balance
- Counterparties - get information and create a new counterparty
- Transfers - creates a transfer
Integration instructions
- Create public and private keys as described in the official Revolut API documentation
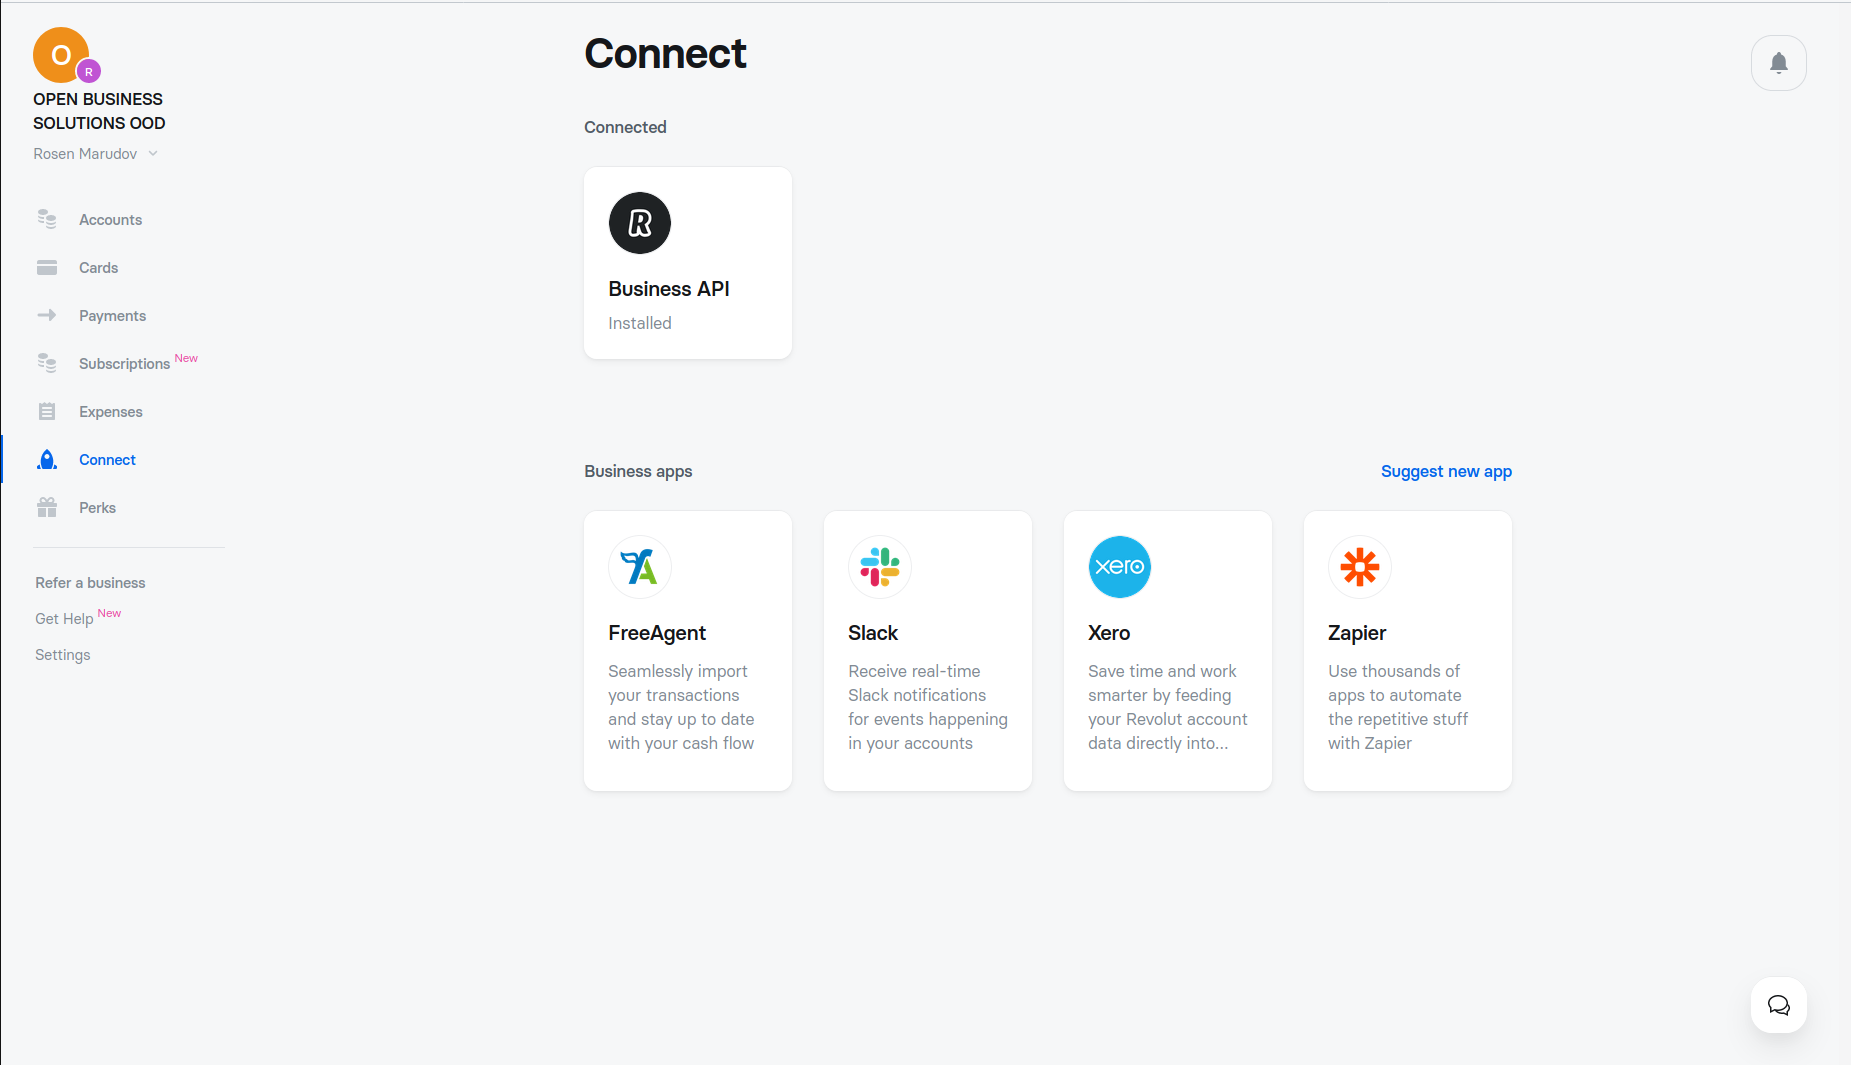
- Create a new API Connection in Revolut as shown below:
2.1 Open "Connect"
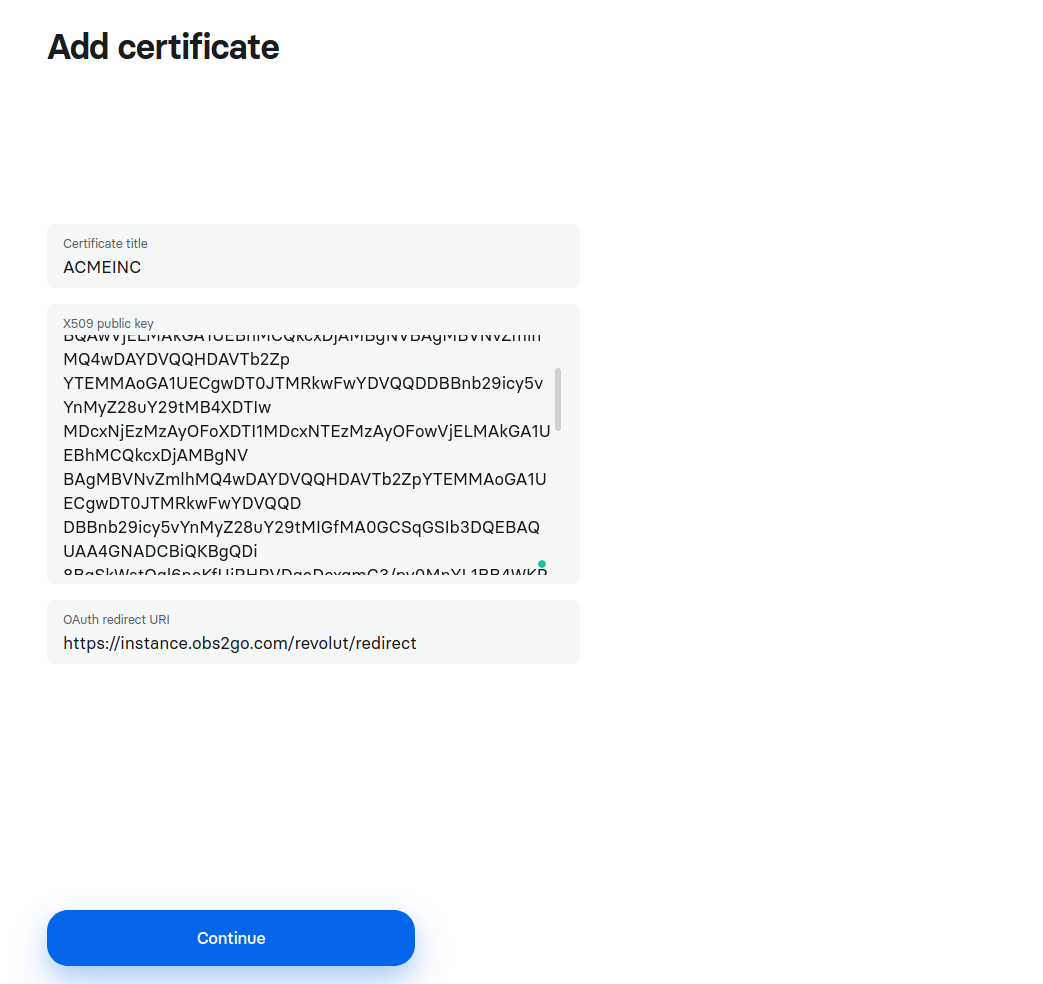
2.2 Add a certifacte - the contents of your public key. PLease note the redirect link. You need to replace "instance" with the name of your OBS ERP instance.
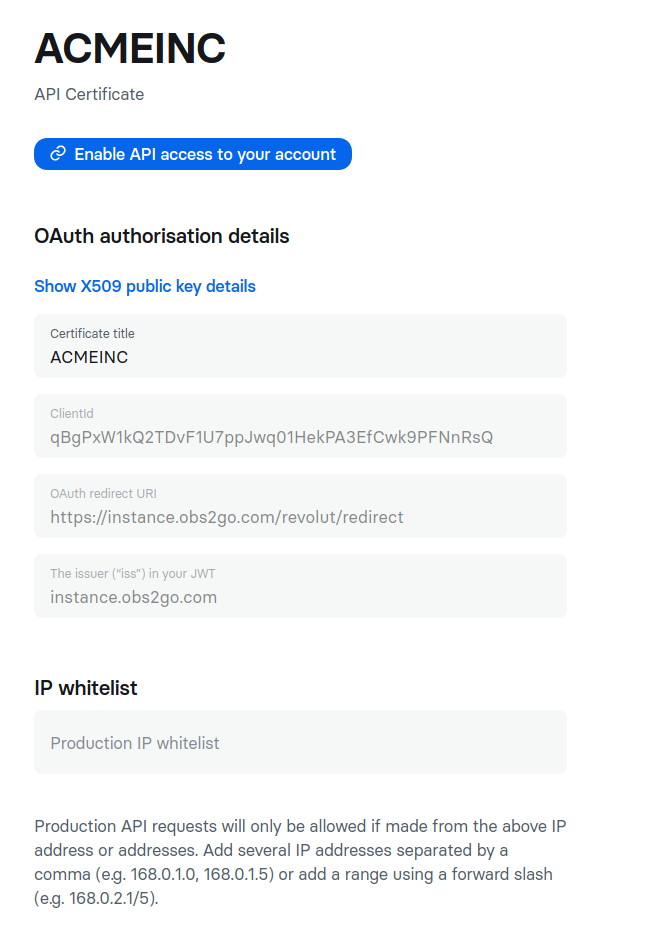
2.3 Note the Client ID
2.4 Add configuration in OBS ERP -> Administration -> Settings ( https://INSTANCE.obs2go.com/modules/settings/all )
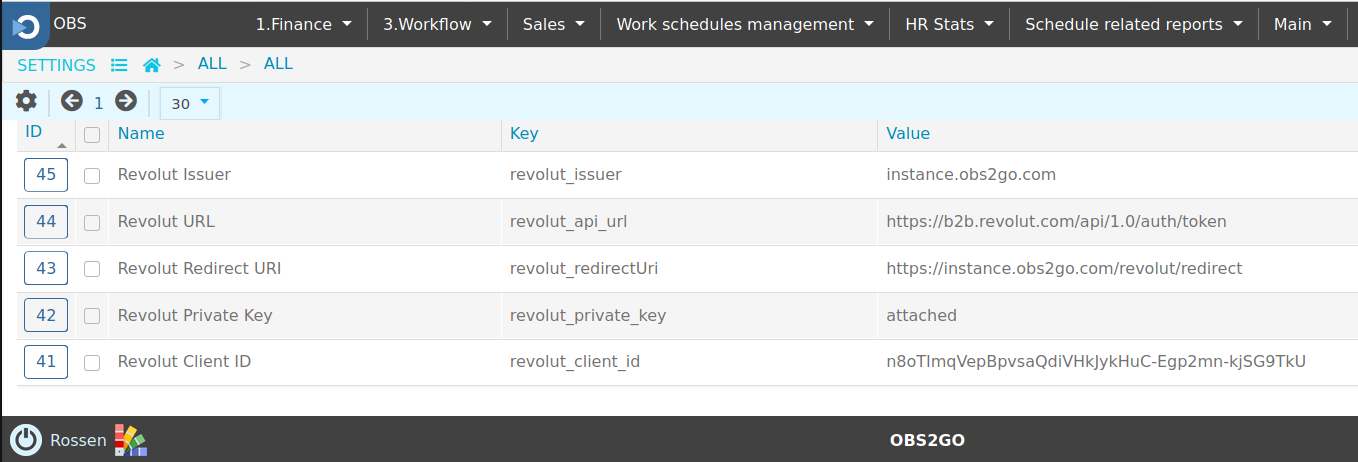
2.5 Attach your private key to setting (revolut_private_key)
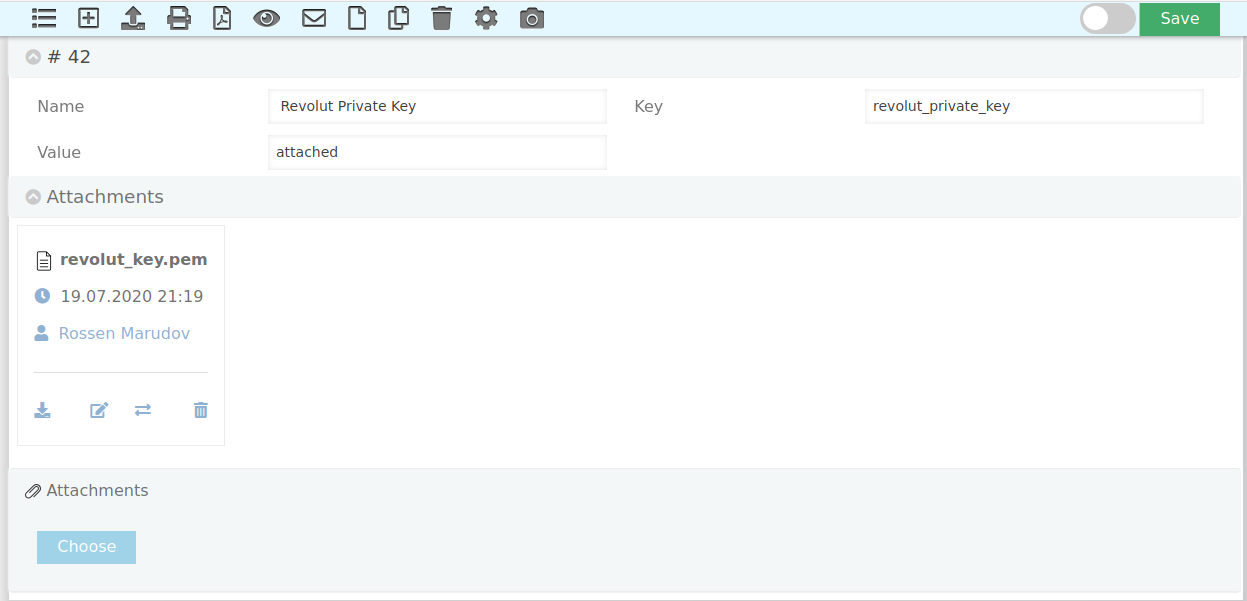
2.6 Go back to Revolut and enable the API Access.
3. Get in touch with OBS ERP representative for special use cases
VIES Validation
OBS ERP is integrated with the European Union's service for VIES VAT number validation. Described here: http://ec.europa.eu/taxation_customs/vies/
You can use this feature in module "Companies" -> Edit Company -> Menu -> VAT EU Check
Authenticator
OBS ERP uses third party tools to implement the two factor authentication. It is integrated with Google Authenticator and any other code generating software.
Bulgarian National Bank
OBS ERP is integrated with the API of the Bulgarian National Bank for exchange rates information.
Google Maps
Auto complete of addresses. Show address on google map
You would need an API key in order to use the google maps integration in OBS ERP.
After obtaining an API KEY, you need to set it up in "Settings" module (Administration -> Settings -> Preferences)
Variable: google_maps_api_key
FrotCom
Functionality:
- GPS vehicle and asset tracking
- Driver management
- Sensor monitoring
Example:
Enablement:
The following settings are required to integrate your OBS instance with FrotCom.
| Setting | Key | Value |
|---|---|---|
| Frotcom API URL | frotcom_api_url | https://v2api.frotcom.com/v2/ |
| Frotcom Password | frotcom_password | XcFo3wHCdAPQREe9o25DchfkA2N6t |
| Frotcom Username | frotcom_user | Sz78596kXuzPzU4 |
The settings shall be entered here: https://YOURINSTANCE.obs2go.com/modules/settings/all
EvroTrust
If EvroTrust is enabled in your OBS ERP instance, you will be able to send PDF documents to recipients for electronic signature. As soon as the document is signed, the signed copy will be downloaded automatically to OBS from the EvroTrust servers. An email confirmation will be received.
1. Single company in one instance:
| Description | Key | Value |
|---|---|---|
| Evrotrust Server Host | evrotrust_host | v.evrotrust.com |
| Evrotrust Vendor Number | evrotrust_vendor_number | 5cscwZ......... |
| Evrotrust - the email address to receive confirmations on signed documents. Comma separated | evrotrust_signature_confirmation | [email protected],[email protected] |
| Evrotrust API KEY | evrotrust_api_key | 96ef8db3-7aba-4d............. |
2. Multiple companies in one instance:
Input your EvroTrust keys here: https://INSTANCE.obs2go.com/modules/evrotrust_keys_by_company/all
Email template for document signature confirmation:
Email template name: document_has_been_signed
Email template content can include URL which will be replaced with link to the signed document. For example:
Hello,

This document has been signed.
URL

Regards,
OBS ERP
Microsoft Active Directory
The following operations can be performed in OBS ERP:
- [Placeholder for Active Directory operations]
Parameter Description
| Parameter | Required/optional | Description |
|---|---|---|
| tenant | required | The {tenant} value in the path of the request can be used to control who can sign into the application. The allowed values are common, organizations, consumers, and tenant identifiers. For more detail, see protocol basics. |
| client_id | required | The Application (client) ID that the Azure portal – App registrations page assigned to your app. |
| grant_type | required | Must be authorization_code for the authorization code flow. |
| scope | required | A space-separated list of scopes. The scopes requested in this leg must be equivalent to or a subset of the scopes requested in the first leg. The scopes must all be from a single resource, along with OIDC scopes (profile, openid, email). For a more detailed explanation of scopes, refer to permissions, consent, and scopes. |
| code | required | The authorization_code that you acquired in the first leg of the flow. |
| redirect_uri | required | The same redirect_uri value that was used to acquire the authorization_code. |
| client_secret | required for web apps | The application secret that you created in the app registration portal for your app. You shouldn't use the application secret in a native app because client_secrets can't be reliably stored on devices. It's required for web apps and web APIs, which have the ability to store the client_secret securely on the server side. The client secret must be URL-encoded before being sent. |
